Showing posts with label reviews. Show all posts

Wednesday, January 23, 2013

Liplicious Best Kiss Haul

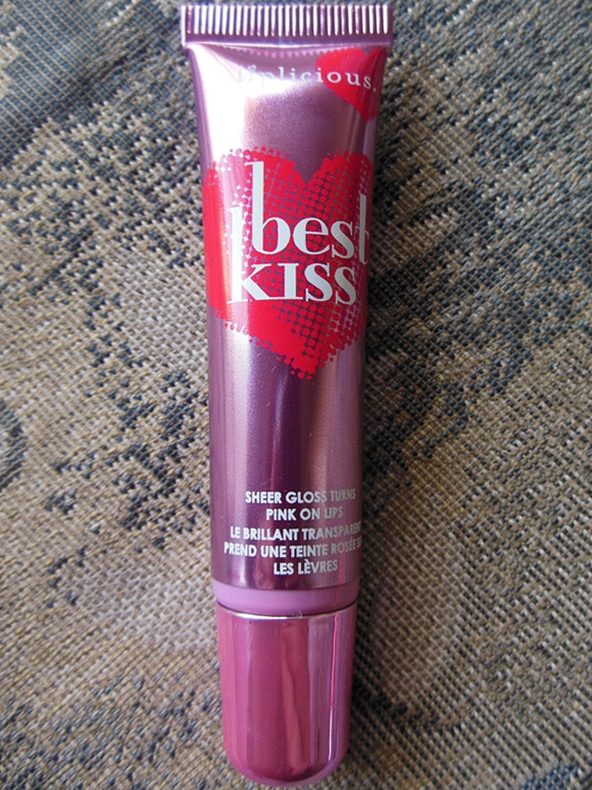
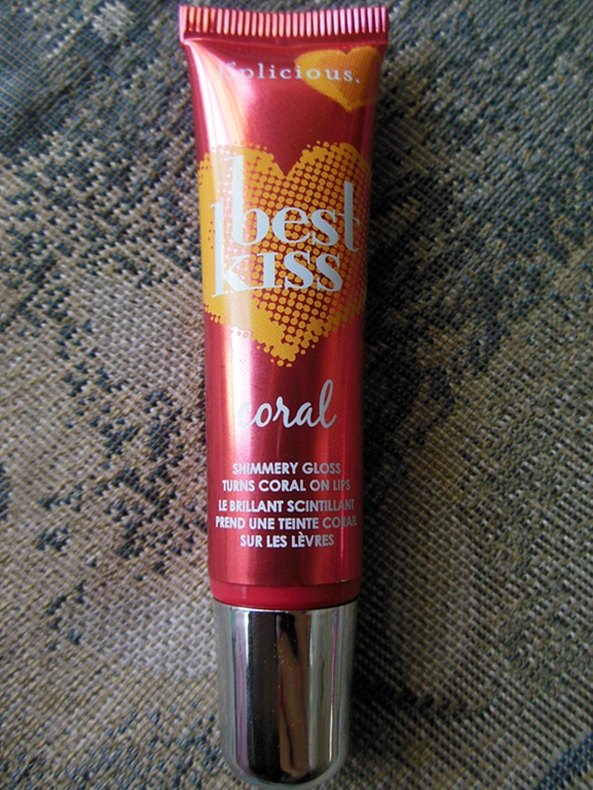
I recently bought a set of colour changing lip glosses by Liplicious called Best Kiss from Bath & Body Works and I love them! I tried to take pictures of them but they didn't turn out true to colour so I'll have to try again another time, but I gotta post the haul pics!

The pink goes on totally clear, then turns to a beautiful neutral toned medium pink on the lips, and it smells like brown sugar. Sooo yummy and gorgeous! This is my current favourite brighter pink lip gloss, it looks bright but still natural. It stains the lips after several hours which also leaves a nice look.

Click here to see a FOTD where I'm wearing the pink Liplicious Best Kiss gloss.

The coral comes out clear with tiny gold shimmer, and then turns a warm orangey colour on the lips. This one I had the most trouble photographing, in pictures it looked just like the pink even though in real life it was definitely orange toned. I haven't tried it yet but I think this would look really great over nude lipstick. It smells like oranges!

The berry lip gloss is a red-toned purple shade, which comes out clear with tiny red shimmer - this shimmer also contributes to this berry shade leaning red, rather than too blue which could start to look a little corpse-like. This is a nice option if you like the idea of berry lips but not the intensity they usually have. Smells like berries :).

I'd recommend all of these! The set is at BBW for about $18 CAD, and last I saw you could just purchase the pink one for about $8.50, but the set is obviously a better deal. They have a nice texture on and a really good wear time, plus the fact that they all start to stain your lips is kind of nice, since even when they eventually do wear off (which I find takes a few hours) they leave the colour on your lips.

Tuesday, January 22, 2013

Review/Swatches: NYX Stick Blushes (Hibiscus, Pink Poppy, and Tulip)

Today I want to review a product that I am completely loving!

If you've been reading my blog for a little while you may recall I reviewed NYX Stick Blush in Hibiscus back in August, but since then I've gotten a couple other shades and I wanted to have one post where I sort of review the product in general, and pool all the swatches. I will probably end up with more shades of this in the future and when I do I'll be sure to swatch them!

These are nice and stiff in the tube, but they apply very smoothly and blend well. To get the best colour level I usually like to swipe it directly on my cheeks, blend with my fingers, and then repeat once or twice depending on how intense I want my blush to be for that particular look.

The longevity is really great, which is nice since that isn't always the case for cream formula blushes. They are also a great size, so they're easy to pack in your purse in case you're out for a very long time and eventually need a touch up.

ALSO - I need to talk about one of the hidden delights of these blushes. They make AWESOME lipsticks. Seriously! I like to pick up the product off the stick with my finger and then pat it on my lips. Pink Poppy especially looks gorgeous on the lips. It creates a really nice put together look to have neutral eyes and then the same shade on your cheeks and lips! And take it from someone with lips that tend to be as dry as the Sahara, these don't dry your lips out like you would think they might!

OK, enough talk though, let's get to the pictures!

 This is all three of the ones I currently own. As you can see, another awesome thing about these blushes is that the packaging is the same colour as the blush on the inside. Even right down to the details - Hibiscus and Tulip are non-shimmery, and so is their packaging. But Pink Poppy has very fine gold shimmer in it, and so does the packaging!
First let's focus on Hibiscus. This is a slightly darker beige toned pink blush with some peach tones. Out of the three it's the most neutral and most peachy type of colour. I wouldn't even really describe this one as overtly pink at all, more like peachy-nude.
Here's a shot of the product inside the package.
And here is a swatch. On the left is it swiped on, and on the right blended out.

Now let's look at Pink Poppy. Pink Poppy is a neutral pink shade with definite peachy tones, and a slight gold shimmer. Very, very pretty!
This picture I think actually shows the colour as a little pinker than it is, and I'm sure you can tell it looks more peachy in the package. It definitely looks like the colour in the package on the skin, and not as dark or "magenta" looking as the swatch on my skin. Camera must have been being funky or the lighting outside wasn't great or something!

Click here to see a FOTD where I'm wearing Pink Poppy on my cheeks.

Last but not least, let's see Tulip! Tulip is a cool toned pink, much more Barbie!
This swatch turned out the most colour accurate I think, although a little more intense than it appears in real life. It's not quite so vivid when you're wearing it on your face!

Overall, I LOVE these products! I have several more shades of this on my wishlist, and I definitely think you should check them out too!

Let me know if you have tried them and what you think!


Sunday, September 02, 2012

Review/NOTD Sep 2/12 - Lush Lacquer's Salt n' Peppa over gradient

I went back and forth in my mind a lot about what to wear under this polish! Since it's a black and white glitter you can wear pretty much anything with it, so it was hard to narrow it down! I thought about some shades, then I thought about doing a different colour on each finger. Then it was a matter of whether to do brights, pastels or ombre from thumb to pinky. I had settled on a selection of colours for each nail, but as I sat down and was about to do it, it hit me that I hadn't done a gradient in a while! So I picked out two of the shades I was going to use and gradient-ized them instead!

I had kind of forgotten the power of a gradient to really give impact to a design and make it look more interesting with minimal effort. I've tried different techniques, but my favourite is still the most basic - paint your nails with the bottom colour (the one closest to your cuticle) and then sponge on the upper colour(s) with a makeup sponge. I also like to go back with the bottom colour to sponge in the middle and blur the line a little better, and then paint a little bit of the tip colour with the brush from the bottle right on the ends to make sure the colour is really opaque there.


Then I topped it off with a coat of my second fantastic shade from Lush Lacquer, Salt n' Peppa! It's an awesome black and white glitter topcoat with all kinds of shapes - bar, hex, square, even vaguely rectangular ones. And there's also some iridescent silvery microglitter tossed in there too, so this has a nice sparkle to it as well as being very graphic and bold looking! It's nice and full of glitter
 just like Mr.Bubble, also no need to fish around for glitter. I did 1.5 to 2 coats anyways to get the coverage I like. The base is not quite as thick as Mr.Bubble too, which is nice.


Colours used for the gradient are Sally Hansen Xtreme Wear in Lacey Lilac and Barielle in Blossom.

Saturday, September 01, 2012

Review: Neo Hair Tools Twister Curling Iron 25/32 mm

I learned the hard way over the years that when it comes to heat styling tools for your hair, it pays to pay. Meaning: cheap hair tools suck.

I'm a HUGE fan of saving money where possible and getting a lot out of a cheap item, but all my experience with heat tools showed me that even the priciest curling iron or flatiron from the drugstore would barely curl my hair, and even if I unloaded half a can of hairspray on it, and then tried my best not to touch it, it would all flatten out and straighten within an hour or so. If I was lucky.

After noticing how much better the style would stay after a hair stylist in a salon did my hair, with presumably far superior tools than my cheapy $40 Revlon curling iron, I decided it was time to invest a bit. So first, last year, I bought my first "big girl" flatiron. It's a Sephora Collection Tourmaline Flatiron, hot pink, and it set me back about $60-$65 or so. Still not expensive really, but WOW what a difference! The girl at the store warned me that this wasn't the greatest hair straightener they had (appreciated her honesty!) but I knew even the cheapest one there would work for my almost straight hair anyways. And boy, did it! The difference was night and day! I can see this not working for girls with wavier hair than me, but if your hair is mostly straight anyways, this is all you need!

So next on my wishlist was a proper curling iron. I am the biggest sucker for that Victoria's Secret, big loose curls, bombshell look. But damned if I could get that going on with my cheap curling irons. If I managed to make anything even approximating that look, it collapsed within hours. But then, as luck would have it, HauteLook had an awesome sale...

I picked out the Neo Hair Tools Twister Curling Iron 25/32 mm. It's a clampless iron (essential for creating big, loose wavy curls as opposed to ringlets) that tapers a bit at the tip. The iron is normally $280, but thanks to HauteLook I got it for the amazing price of $49! I know I sound like an infomercial, but seriously, that's good. Also, it comes with a handy glove to protect your hands from the heat. But I don't like wearing those, so I burned my hand several times! Hehehe, oops....

It arrived a couple days ago, and when I tested it out, once again, I was floored at the difference between it and cheaper models. It curled faster, and it held WAY longer. And I used far less hairspray than I normally would. I even slept in my curls, and woke up with them still looking quite formed and defined, maybe a couple rumpled spots where it needs a touch-up but still obviously curly - never happened before, usually sleeping in curled hair=waking up with straight hair again for me!


There were some cons about this iron though, which you may want to know about. For one thing, there is no dial to adjust the temperature. It doesn't bother me since I usually don't anyways, but it's worth knowing.

 Also, you have be careful because for some strange reason, there is no indicator light to show that it's on. You can look at the on/off switch of course, but just being able to quickly glance to see if there's a light on would be an easy feature for them to have added. Other than that, I really love it and can see myself curling my hair a LOT more now! Whoooop!!


Thursday, August 30, 2012

Review/NOTD Aug 30/12 - Lush Lacquer's "Mr.Bubble"

I finally got my toe into the indie polishes pool, and I think I picked a couple of real good ones for my firsts! I decided the two I wanted most were from Lush Lacquer, a shop run by a mother and daughter team! I bought two shades, Mr.Bubble and Salt n' Peppa. Today I'll review and show you a swatch of Mr.Bubble!


The polish is in a clear base, and contains large and small hex glitters in matte white, matte pink, and matte blue. This is my first matte glitter and I love the way it looks! It's so fresh and different from the glitter I'm used to.


This is it on my nails, layered over two coats of Sally Hansen Xtreme Wear in Wet Cement. My boyfriend actually pointed out that this looks like a retro linoleum floor, which is so true! I also really want to try this over a sheer light pink, like Essence Sweet as Candy. It would probably make a cool glitter sandwich candidate too - so many options!

The amount of glitter in this polish is awesome - you really don't have to fish. I have about two coats of glitter on here, but really it was one coat, and then a very bare second coat where I wiped off the brush almost completely before applying - just to fill in spaces where I felt there weren't enough large hex. It's pretty thick, so I can see this needing thinner eventually, but they include a note warning of that so no surprises there!

I'll leave you with one more bottle shot to admire! Next up will be Salt n' Peppa!


Sunday, August 19, 2012

Review: NYX Tango with Bronzing Stix in Tango and Highlight

This is the other item I got in my HauteLook NYX haul! It's a stick of highlighter! This is my third highlighter I've owned, so far I have had liquid, pressed powder and now stick form!

This one is the most different in terms of colour - the other two I have are nude and pink-toned, respectively. This one is very warm and golden toned, so it's a good addition to my collection!


Here's a swatch, on the left is swiped straight on and on the right it's been blended out a bit.


The pigmentation on this is pretty good, I wouldn't want it to be too overwhelming for a highlighting product. It's nice and shimmery which I also love for highlighters. It's not the most blendable because it's a little on the dry side, but I find the best way to apply is to swipe it with a couple fingers, and then dab/blend that onto the cheekbones. It gives a nice golden, summery glow!

Friday, August 17, 2012

Review: NYX One Night in Morocco Matte Smokey Look Palette (long, and lots of pictures!)

HauteLook had another great sale recently, this time on NYX stuff. I checked out reviews for some of the stuff available (I never buy online without researching reviews!) and heard lots of good things about this palette. And the hype was well deserved! I've had this for a couple days and used it twice, and I really truly love it!


The palette itself is a nice size - this fits in my hand just perfectly. Inside, it houses 8 eyeshadows, eyeshadow base, and four lipglosses. One of the beauties of this palette is that the lipglosses are completely seperate from the shadows! Hallelujah! I don't normally use the glosses in palettes anyways (I like them more portable for touchups) but even if I did, the fact that most palette lipglosses get covered in eyeshadow so quickly would ruin those intentions fast!


The top section of the palette opens by flipping up the lid, just like your usual compact, and that's where the shadows and base are. The lipglosses are in a little pull out drawer below. Genius! You can open just the gloss section without having to open the shadow section too.


The only flaw with this kind of packaging is that if you open the mirrored part all the way, it kind of pops out the drawer a little, making it more awkward to hold while you use the mirror if you happen to have smallish hands like me.


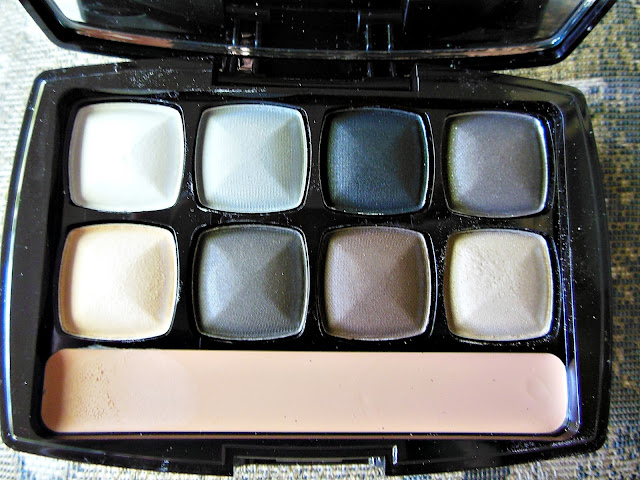
So let's get into some details! The shadows themselves are not entirely matte. You will notice when you open it up that some of the shadows appear to have a bit of shimmer. BUT! But.... they are not shimmery! Once you actually apply them, it seems more like a satin finish for those shades - they really just seem to be more blendable and evenly pigmented because of this. On the skin the shimmer doesn't show, they still look satiny-matte. I think that little bit of shimmer just keeps them from looking chalky, which is so easy to happen with matte shadows.


Top row, left to right:
  • Cool white shade, matte
  • Cool light-medium grey, matte
  • Black, very slight shimmer, satin
  • Brown-toned medium taupe, satin with slight shimmer

Bottom row, left to right:
  • Warm-toned light sand colour, satin with slight shimmer
  • Cool dark brown, matte
  • Warm dark brown, matte
  • Light champagne-taupe shade, satin with slight shimmer (this didn't show up well in the photo, it looks really similar to the first shade in this row but it's not - I would consider it a lid shade whereas the first one would be highlight or a very light lid shade. This one is darker, cooler and more taupe)
The eyeshadow base I was not so jazzed about. I tried a little on the back of my hand, and I noticed when I put the light eyeshadows over it (especially the white) they kind of disappeared into it, because the base isn't translucent, it's really the colour seen in the pan. So the white shadow turned the colour of the base. I prefer bases that are either totally translucent so they don't change the colour of my eyeshadow, or if they have to be coloured, white so that they intensify the shade rather than absorb it. So I haven't tried using it on my eyes, and can't comment as to how well it holds up as a primer!

 The lipglosses are fairly standard for palette glosses - meaning they seem like more of an afterthought than a purposeful part of the package. They aren't awful, but they just don't have the same quality as the others. The pigment isn't strong, but I wouldn't expect it to be. I also have pretty pigmented lips, and I happen to like low-pigment lip products, so it works for me. I just prefer individual glosses to ones in palettes anyways. The shades are a light cool pink, a deeper neutral rose, a light peach, and a deeper warm toned rose with a bit of a terracotta cast to it. Again, I know that's not how it looks in the picture- guess my camera was being wacky! But the left two are cooler, the right two are warmer. They did a nice job in this entire palette of having a good balance of warm and cool shades. These glosses do feel moisturizing on the lips, not sticky nor too slick like petroleum jelly.

Overall, I would absolutely 100% recommend this palette. The shadows go on like butter, the pigmentation is great and they blend very well. The mixture of cool and warm shades is nice (although I would have to say it leans a little more cool overall) and you can create lots of great looks with it. I've already worn it twice, for two very different looks, and I'm keen to keep experimenting with it! I will have pictures of those looks up very soon for you to see, as well as a review for the other item I purchased from this HauteLook NYX sale!


Thursday, August 02, 2012

Review: NYX Stick Blush in Hibiscus

The other day I was in one of the few and far between stores around here that sells NYX (although I did here an exciting rumour recently that a mall nearby will be getting a standalone NYX store! Exciting!!) and picked up their Stick Blush in Hibiscus (a.k.a. shade SB 03 - but Hibiscus is more memorable). I've used their Rouge Cream blush before, which is in a little compact, and adored it, so I wanted to give this a shot too. For some reason I've never actually bought a powder blush from NYX - I just keep having good luck with their cream formulas, and this one is no exception.


There's a shot of the packaging. Basic, plastic, nothing to write home about. There is a little heart on the top of the cap, which I think is cute for what it's worth.


Here's the blush itself! I would describe the shade as a medium melon-beige... melon as in a toned down coral with a little bit more pink. And then beiged down. It's sort of a "perky neutral" blush. I usually steer clear of blushes that are more neutral toned and veer more towards brighter corals, pinks and peaches, but I wanted something different this time and I'm glad I did it! In this case, neutral does not equal boring! It gives a really natural, believable flush, for when you want that look.


Here I am wearing it, with just a swipe applied to the cheek and blended with my fingers. This is a bit of a thicker formula, but still nicely blendable. It didn't stay all wet and tacky on my face but it also didn't dry instantly leaving me with no time to blend. The formula is really nice in that way. The staying power is average but for such an easily portable item, I don't mind having to reapply once or twice - easier than pulling out a powder compact and a brush! And then you get that fresh, dewy cream blush finish refreshed too!


This is a great blush for when you want your cheeks to be a supporting player in your look - natural, glowy, easy to apply.

Friday, May 25, 2012

NOTD May 25/12 - gold round studs on nude

Part two of my reviews for Born Pretty Store! The second product they kindly sent me was a package of their 1.5 mm golden studs. I'd seen lots of cool manis around the web using these, and I knew I needed to get me some! Now I'm so glad I did because I did my first look with them today and I am in love with it!

I started with a couple coats of Beaches & Dreams by Barielle, and then arranged the studs in two rows down the middle of each nail. Very simple, just a bit fiddly to do! And veery fiddly to get the extra studs back in the back! LOL But totally worth it!


I can totally see myself using these again and again! They're a wicked bargain too, only about $4 a bag and you get TONS of them! Definitely try these babies out!

Tuesday, May 22, 2012

NOTD May 22/12 - gradient and rhinestones

Hey everyone! I'm really happy about my manicure today! I love the look of rhinestones all clustered together, mosaic-style, and I did try it once. Problem was, all the rhinestones I had used were the same size, so it wasn't possible to really cram them all together, just next to each other. It just didn't have the look I was going for and so, I had to scrap that manicure! I knew I needed some multi-sized rhinestones to create the look I was going for, and luckily Born Pretty Store came through for me! They generously provided me with a couple of goodies, the first of which I want to show you today!

I started off with a gradient base, using a new technique for creating gradients I saw at The Nailasaurus! It worked very nicely, I love the results! I need a little more practice to totally get it down but it wasn't difficult at all and the results are great!

Then, I went to work with my rhinestones! The smallest of these are just teeny tiny! Be careful or these will end up everywhere! The rhinestones come in three sizes, the wheel has four compartments of each size. I arranged them in a crescent shape in the lower left corner of each nail, starting with a large rhinstone, adding a couple medium sized ones, and filling in the spaces and the "tails" with the tiny ones. Bit of topcoat on top and voila!


I'm really happy with how this turned out, I hope you like it too! Check out this product at Born Pretty Store and if you like what you can do with them, grab some! The price is awesome!

Colours used:
Barielle in Blossom
Revlon Top Speed in Electric

Thursday, April 05, 2012

FOTD Apr 5/12 and review of Essence makeup

As promised in my Essence haul post, I did a FOTD with my new goodies! So far I'm really loving all the new stuff I got and I really just want to go get more!! The shadows applied like a dream - very pigmented and easy to blend, and the colours in the quad just go perfectly together and make it so easy to create a look. I can also see this palette being easy to take from day to night - more of the lighter shades for day, more dark shades for night. Taupe smokey eyes are HAWT!

Here's the look I created using my new products.


Eyes:
  • Essence Quattro Eyeshadow Palette in Over the Taupe
  • Essence Gel Eyeliner in London Baby
  • CoverGirl LashBlast Volume Waterproof in Blackest Black
Face/Cheeks:
  • Rimmel Lasting Finish 25 Hour Foundation
  • Urban Decay 24/7 Concealer Pencil
  •  Essence Silky Touch Blush in Babydoll
Lips:
  • Essence Lipstick in Coralize Me!
The blush has a nice amount of pigmentation - it never gets too dark or bright so it's perfect for a day look, it's really hard to go overboard on this one. The lipstick has a similar pigmentation, and it's very moisturizing on the lips. It seems to have pretty good lasting power too, considering it's fairly sheer and not drying. I'm loving all these products and I wanna hit up that Essence display again ASAP!

    Monday, February 20, 2012

    Review: Bath & Body Works Triple Moisture Body Cream (in Carried Away)

    Not too long ago the first Bath & Body Works I'd seen in my neck of the woods opened in the same mall I work at. I'm not really a body lotion junkie like some girls - in fact I stopped in because I actually needed to buy new body lotion since I was almost out - how many girls can say that!? Most people I know (including myself in the past) have about five or more bottles on the go at a time. But I made myself finish them first before buying more and I'm glad I waited til this moment!

    Since I had never tried anything from the company before, I decided to take advantage of the promo they had (not sure if it was a regular thing or a temporary sale) with 3 minis for $10. That's the first thing that struck me about this store actually - how afforable everything was! Mini lotions were $6 (or 3 for $10) and full sized ones were $12! Totally reasonable prices so I was really happy to see that.

    For my trio of minis I picked two body lotions - a slightly thinner consistency lotion which was recommended to me by the sales associate when I mentioned I liked the scents of a couple creams but thought they might be too strong - apparently the lotion versions don't have as heavy a scent as their cream counterparts. Makes sense right? For the lotions I got Pink Chiffon and Bali Mango. And then for the Triple Moisture Body Cream I got Carried Away!


    I'm teeerrible at identifying fragrance notes, so all I can really tell you about the scent is that it's flowery, and girly. But that's not really why I'm writing this review anyways - I'm writing it to rave about the amazing texture of this cream!

    You know the feeling your face has after you apply primer? That really soft, smooth, almost powdery finish that glides like silk?

    Yup, that's what my whole body felt like after applying this cream. It was amazing and unlike any other cream I've ever tried. It's been half an hour since I applied this (and applied tanning lotion over top) and my skin still feels the same way.

    There is NO doubt in my mind that I will be buying more of this formula. I'm excited to try out the body lotions and see if they approximate this feeling too - I'm not sure if they will since they are an admittedly thinner, less rich formula, but I'm sure they're still excellent quality.

    For this price and these results, Bath & Body Works has won me over with their Triple Moisture Body Cream formula!

    Tuesday, February 14, 2012

    Review: Gosh Bronzing Powder

    I've been on a long hunt for the perfect bronzer. I found many that may very well have fit the bill, but there was always a catch - they cost way more than I wanted to pay! Benefit Hoola is around $35, and Nars Laguna is $40 - both bronzers I considered buying many times, but couldn't justify the cost of. And most drugstore bronzers either tended to be way too shimmery, too orange or the texture of the powder wasn't smooth enough.

    But the other day, that all changed.... I was browsing around in Shopper's Drug Mart and took a peek at the Gosh display, which I don't do all that often - and their bronzer caught my eye, because at first glance it actually looked... brown! Not orange!! Luckily they had a tester out so I swatched it and fell in love immediately. The texture is soft and smooth and the powder is very pigmented. It has a satin finish so it looks natural on the skin without being sparkly. The colour is perfect - a soft, warm brown. Oh, and the price? $20! It's more than most drugstore bronzers are, but far superior in quality, and I prefer the colour and texture to the higher end bronzers I've tested in Sephora.

    Here's some photos of the packaging. It's fairly basic, no mirror - which doesn't bug me since the only makeup I touch up throughout the day are things like concealer, liner and mascara. The clasp seems to close quite securely, it doesn't feel flimsy at all.


    Here is a swatch on the back of my hand, taken in daylight.

     And last but not least, my Valentine's Day makeup! I'm wearing the bronzer as light contour along the sides of my nose, under my cheekbones and my jawline! I suppose that also makes this a bit of a FOTD post. :)