Tuesday, January 22, 2013

Review/Swatches: NYX Stick Blushes (Hibiscus, Pink Poppy, and Tulip)

Today I want to review a product that I am completely loving!

If you've been reading my blog for a little while you may recall I reviewed NYX Stick Blush in Hibiscus back in August, but since then I've gotten a couple other shades and I wanted to have one post where I sort of review the product in general, and pool all the swatches. I will probably end up with more shades of this in the future and when I do I'll be sure to swatch them!

These are nice and stiff in the tube, but they apply very smoothly and blend well. To get the best colour level I usually like to swipe it directly on my cheeks, blend with my fingers, and then repeat once or twice depending on how intense I want my blush to be for that particular look.

The longevity is really great, which is nice since that isn't always the case for cream formula blushes. They are also a great size, so they're easy to pack in your purse in case you're out for a very long time and eventually need a touch up.

ALSO - I need to talk about one of the hidden delights of these blushes. They make AWESOME lipsticks. Seriously! I like to pick up the product off the stick with my finger and then pat it on my lips. Pink Poppy especially looks gorgeous on the lips. It creates a really nice put together look to have neutral eyes and then the same shade on your cheeks and lips! And take it from someone with lips that tend to be as dry as the Sahara, these don't dry your lips out like you would think they might!

OK, enough talk though, let's get to the pictures!

 This is all three of the ones I currently own. As you can see, another awesome thing about these blushes is that the packaging is the same colour as the blush on the inside. Even right down to the details - Hibiscus and Tulip are non-shimmery, and so is their packaging. But Pink Poppy has very fine gold shimmer in it, and so does the packaging!
First let's focus on Hibiscus. This is a slightly darker beige toned pink blush with some peach tones. Out of the three it's the most neutral and most peachy type of colour. I wouldn't even really describe this one as overtly pink at all, more like peachy-nude.
Here's a shot of the product inside the package.
And here is a swatch. On the left is it swiped on, and on the right blended out.

Now let's look at Pink Poppy. Pink Poppy is a neutral pink shade with definite peachy tones, and a slight gold shimmer. Very, very pretty!
This picture I think actually shows the colour as a little pinker than it is, and I'm sure you can tell it looks more peachy in the package. It definitely looks like the colour in the package on the skin, and not as dark or "magenta" looking as the swatch on my skin. Camera must have been being funky or the lighting outside wasn't great or something!

Click here to see a FOTD where I'm wearing Pink Poppy on my cheeks.

Last but not least, let's see Tulip! Tulip is a cool toned pink, much more Barbie!
This swatch turned out the most colour accurate I think, although a little more intense than it appears in real life. It's not quite so vivid when you're wearing it on your face!

Overall, I LOVE these products! I have several more shades of this on my wishlist, and I definitely think you should check them out too!

Let me know if you have tried them and what you think!


Monday, January 21, 2013

NOTD Jan 21/12 - mint and magenta with studs

This was a manicure that started out totally different and then needed to be resuscitated because it failed SO BAD!

Remember that Aruba Coconut manicure I did the other day? I wanted to carry on the Bath & Body Works Escape Collection theme, so I started the mani with several magenta nails, and then on the middle nails I was going to do a design based on the packaging of another bottle from that collection. But they looked SOOOOOOO bad. Like laughably bad guys. Epic fail bad.

So I wiped off the polish from those two nails and quickly did something simple so I wouldn't spend another eon doing my nails!

Also, forgive my subpar indoor lighting photo-taking skills. My new job is a full time 9-5 type deal, so there are not going to be many opportunities for me to take manicure photos in daylight unless I start bringing my camera to the office and taking photos out the back during my lunch. Which is an idea, come to think of it...


Both of these were polishes I bought yesterday, and both Revlon. The pink is Revlon Top Speed Bubble, and I LOVE it. The formula on this polish is amazeballs. So smooth and gorgeous, perfect in two coats. The colour is straight up BARBIE. <3 <3 <3 I don't usually go this googoo for pinks but what can I say... the mint is a repurchase, it was on clearance at the drugstore, Revlon Minted. Studs are from Bornprettystore.com!

Saturday, January 19, 2013

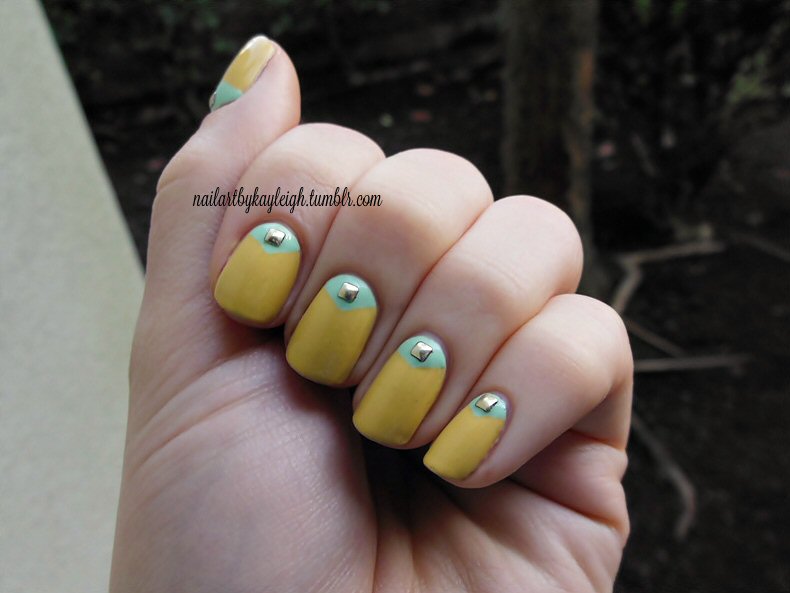
NOTD Jan 19/13 - inspired by Madeline Poole

I saw this gorgeous mani on Tumblr, and something about the simple design and the yummy colours just caught my eye! I had to recreate it!

I tweaked the design a bit for myself, instead of the rhinestones I did a single gold pyramid stud on each nail. Love how this turned out, couldn't stop staring at my hands last night. :)


 The yellow is NYX Salon Polish in Pastel Yellow and I painted the triangles on with Sally Hansen Xtreme Wear in Mint Sorbet.

Friday, January 18, 2013

FOTD Jan 18/13 - subtle cat eye

I based this off a Pinterest look I found recently!! Very simple to do and pretty!

The look was mainly simple eyeshadow - just skin toned shadow on the lids, a slightly darker warm brown in the crease (I used Urban Decay Buck) and a shimmery white on the inner corners. Then I drew on a cat eye with a black eyeliner pencil (CoverGirl Liquiline Blast in Black Fire) but went over it with an angled brush in a charcoal eyeshadow to soften it up (I used MAC Knight Divine).

On my cheeks I'm wearing NYX Stick Blush in Pink Poppy and on my lips I'm wearing Liplicious Best Kiss colour-changing pink lip gloss, both of which I'll be reviewing soon!

Here's some close ups of the makeup! :)


Thursday, January 17, 2013

NOTD Jan 17/13 - Mr.Bubble gradient ruffian

Sometimes you just sit down to paint your nails with no real idea what you're going to do. You just look at your polishes til something jumps out at you and then you go with it.

When I did these nails, Lush Lacquer's Mr.Bubble screamed out at me for some more love - it's such an awesome polish but I've only worn it once. I decided to layer it over white polish (which I'm realizing is my manicure base colour of choice) in a cuticle gradient. But once I did it it just didn't seem like quite enough. There didn't seem to be enough of a fade from cuticle to tips, so it looked like I just painted half my nails with glitter. Not the effect I wanted. So to give the cuticle area more impact I painted on a stripe of Essence Ultimate Pink and turned it into a ruffian.

It was only after I'd finished that I had the thought that someone seeing my hands from a distance might think I had some horrible cuticle infection because of the bright pink colour! LOL But I had lots of compliments at work so I guess that wasn't the first thing people thought when they saw them!

I think these turned out pretty cool and unique looking, I don't think I've ever really seen a manicure like this one!


Friday, January 11, 2013

NOTD Jan 11/13 - Aruba Coconut tropical leaves

As many of you may know, I work at Bath & Body Works (although not for much longer!). This week we've begun receiving product for spring/summer, including the new 2013 repackages of the tropical themed Signature Collection products like Aruba Coconut, Bali Mango and Rio Rumberry.

You can already check them out on the website, although they won't be available in stores until after the weekend, but oh my goodness, the packaging is GORGEOUS. I knew I had to do some manicures inspired by them!

I started with Aruba Coconut. This mani is one of those ones I love the most when I see it from a bit of a distance, but when I look at it up close I get really nitpicky about the shapes of the leaves! Next time I try a design like this I'll probably use the sandwich bag method because it was hard to freehand the leaves on my own nails. But overall I really like this mani and the colours especially!


Background colour is a polish I picked up at the dollar store, and I am very impressed by it! I'll be back to grab more shades. It's Tivoli Color Shock NP153 (no real name :( I hate that!). Then the leaves are Sally Hansen Xtreme Wear in Mellow Yellow and Green With Envy, LA Girl Disco Brites in Turntable, Essence Walk on Air, and one bit of the leaves is a mixture of the two previous shades.

Thursday, January 10, 2013

The Essence hauls continue!

Essence is one of those brands that's hard not to haul, it's so cheap! But I always find their products to be pretty good quality, especially for the price you pay!

I will have swatches and reviews for these at a later date. :)

 This haul was comprised of Essence Eyeshadow in Cappuccino, Please!, Essence Mattifying Compact Powder in Transluscent, and Essence Liquid Eyeliner in Black.


Wednesday, January 09, 2013

Top 12 Manicures of 2012

I did this last year for 2011 and meant to get it done sooner for 2012, but better late than never! It's always fun to look back and remember manis you were really excited about!

These are all my personal favourites out of the manicures I did in the past year. :) It was so hard to narrow it down to 12, I looked back and really loved a lot of the manis I did this year! It was also harder than 2011 because I only started doing nail art in June of 2011, but this time I had a full year of designs to pick from! According to my count, I did 81 manicures in 2012!

These aren't in any particular order except going from earliest in the year to most recent!


Tuesday, January 08, 2013

NOTD Jan 8/13 - ice cream and sprinkles

Somehow this is the third ice cream manicure I've done, but I don't feel like I've done that many....? Weird!

Anyhow, this is the first ice cream cone manicure I've done - this one was inspired by the super talented This is Venice! I am in looooove with how these turned out! I realized after I did them that they're probably pretty summery for a January manicure but who cares?! They look awesome!

  I used about eight-bergillion colours for this (give or take a few bergillion :p) so if you're curious about a certain shade, ask in the comments! :)

Monday, January 07, 2013

NOTD Jan 7/12 - glitter space

This could be termed the lazy woman's galaxy manicure as well! I just wanted to test out the new polish I picked up at Shoppers Drug Mart, Essence Chic Reloaded. In the bottle it is dark shimmery reddish purple with a little bit of greenish duochrome. The green doesn't translate onto the nail from what I can see, but the reddish-purple looks so cool on the nails I'm not even mad! It's shimmery but dark enough to be kind of vampy, but it doesn't stray into that so dark you need a spotlight on it to tell whether it's black or not kind of territory.

But I can never seem to leave well enough alone, so I had to add something - glitter! I used Wet n' Wild Kaleidoscope, which looks like a dark silver glitter but on the nails a lot of the pieces flash rainbow colours, and it's all various sizes of smaller glitter. These were hard to stop staring at!


In other news, I wanted to share the happy announcement that I will shortly be starting a new job! I took a course in the fall to qualify for my level 1 insurance broker/adjuster's license, and I just got a job at a brokerage! The start of a new job is always exciting, and the start of a new career is even moreso! :D