Saturday, September 29, 2012

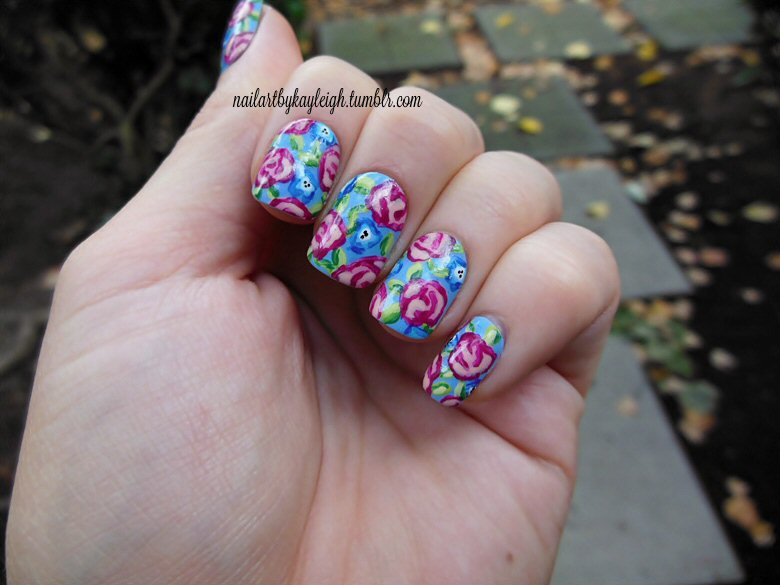
NOTD Sep 29/12 - intricate floral on periwinkle

This one was kind of hard to think of a name for! Intricate floral on periwinkle? Sure, I guess that works!

This is another design based on a vintage fabric pattern. I painted it on a set of falsies this time, and I really love how they turned out! I think this pattern is so beautiful! It's roses, leaves and vines and also some little blue flowers interspersed!


 There are many colours involved here, so if you are curious about any particular one feel free to ask in the comments! I will say that the background colour is Revlon Dreamer!

Friday, September 28, 2012

FOTD Sep 28/12 - no eyeshadow and darker hair!

This is a look I pretty much NEVER go with, but it was born of necessity this time! I have no idea why but recently my eyelids have been really dry and irritated, which is something that has never happened to me. I don't know why it's happening but I'm trying to keep from irritating them further, so when I did this look (actually yesterday) I tried to do a look that didn't have any eyeshadow. Well, that's not entirely true - I did a tiny bit of shadow just along the lashline on the outer corners for a bit of definition. But nothing on the lids themselves!

Since I'm not used to going without shadow, it was a bit of an experiment for me! I decided to balance out the lack of eyeshadow with extra mascara, bright blush and pinky nude lips.


And as you can also see, my hair is back to darker! I was overdue for a re-dye!


I styled my hair by twisting the hair back and pulling more hair into the twist as I went back, and then pinning it on the back of my head. And then lots of hairspray and pins to keep the shorter bits from falling out!


There were a couple new elements in my makeup too, besides the lack of eyeshadow on the lids! I finally decided to try out another mascara, after only using Cover Girl Lashblast waterproof for the past few years! I picked up Essence Get Big! Lashes in Waterproof... and I'm glad I did! Although it's not replacing my CG Lashblast (I still love it the best!) I like it for layering. I've found to get a ton of volume on lashes you want to layer two different kinds, one coat after another. I did that with the CG and the Essence mascaras and was able to get a lot more volume.

Also new was a kind of lipstick hack I did. Last year I bought Wet n' Wild Mega Last Lip Color in Just Peachy (903C) and I loooved the colour but found that the matte finish just didn't work on me. My lips are very dry and tend to get really flaky, very quickly. So matte is not an option for me. But I didn't want to lose that awesome colour! So I bought some little plastic pop-top containers from the dollar store, and created a gloss out of it instead! I mixed the lipstick, some Vaseline, and a bit of two kinds of lip gloss (one more pink and one more nude-peach) together and created what I'm wearing on my lips! It's got a glossy finish but a really opaque colour because the lipstick was such an opaque shade. I love it!!

I also wore two bright pinky blushes here, a cream with a powder layered on top.

Have you ever had to change up your usual makeup routine or try something totally different unexpectedly? How did you adapt, and what did you have to do?

Wednesday, September 26, 2012

NOTD Sep 26/12 - owls

Sort of a fall inspired design, some cute little owls! I created these using those paper sticker hole reinforcements and I have to say, not a technique I'm eager to try again. Everyone raves about those but they just do not work well for me... I think my nail bed is a little too curved or something, because they stick fine to the middle of my nail but lift away from the sides and then the polish just bleeds under. I tried so many ways and it's literally impossible to make them lay flat on my nail bed. I had to go back and correct most of them with a brush! Too bad too, in theory I like the idea but on my nails it just doesn't wanna happen!

The brown shade is Revlon Stormy, the pale dove grey is Revlon Cloud, and the beaks and feet are OPI The "It" Color. And of course there's black and white which don't really need mentions.


 Regardless of issues with the hole reinforcements, I love how these little cuties turned out! I was inspired by some cute owl artwork I'd seen in a craft pin in Pinterest. Which, by the way, is my new obsession. I know I'm a little late on that train but whatever, I let all the good stuff build up on there before I got into it! I've been pinning tons of recipes, a few of which I've made. And also lots of decorating and DIY stuff... I started decorating my place for Halloween much earlier than usual and so far I'm loving it!

This is my mantle... mini and peewee pumpkins painted with black and white acrylic paint, some pinecones, candles (cinnamon scented!) and little cutout ghosts and "Boo!" signs! And of course and awesome DIY bat garland. Love it! I want to do a bit more with this but it's a good start!


Bat, owl and skull cutouts over the couch! I also want to add something else here, maybe some ghosts in between.

Saturday, September 22, 2012

NOTD Sep 22/12 - hearts and roses

This design is from an upcoming nail wheel I'm working on, which is all more complex patterns to challenge myself a bit. A lot of them, including this one, are based on vintage patterned fabrics I found online! I loved this pattern with roses and rosebuds and cute little hearts interspersed among them!

I made these using the DIY nail decal tutorial I made, which is a pretty fun technique if you've never tried it! Perfect for designs like this that are difficult to paint on your own hand, especially with your non-dominant hand.

There were many colours used in this design (the white, two greens, four to five pinks or something like that) so if you really are dying of curiousity about what any of them are, feel free to leave a comment and let me know! Otherwise I'm going to go the lazy, tired route and just leave that part out for today! LOL! Hope you like this design, thanks for reading!

Thursday, September 20, 2012

NOTD Sep 20/12 - apples!

I wanted something really cute and simple this time - I had started another design but it just was not turning out so I started over and didn't want to do something else time-intensive! I hadn't checked out anything on the CutePolish channel on YouTube in a while, so I looked at it and she had posted this adorable apple manicure about a month ago! I thought it was so sweet so I decided to replicate it!

I followed all the steps in the video, using Wet n' Wild Wild Shine in Red Red, Sally Hansen Xtreme Wear in Green With Envy, and Cherimoya Melon for the apples. I used Revlon Chocolate Truffle for the stems and Sinful Colors Envy for the leaves. She didn't include this in her tutorial, but I added some white reflection marks on the apples to make them look really shiny and juicy! I love these, they're so cute to look at! I haven't done a "fancy tips" style manicure probably since I did a Hello Kitty mani around a year ago!

Tuesday, September 18, 2012

NOTD Sep 18/12 - matte mixed

I always feel like I'm never doing enough matte manis! I love the way they look and I really love the way they feel (so soft!) but I never seem to make them happen. I especially like how glitter looks mattified but I didn't want to do an all-glitter matte mani because that's all I've ever done with the texture before. So I went for a mixed mani with glitter incorporated for this one!


I painted my ring finger with Revlon Impulsive, and the rest with Revlon Dreamer. I painted Milani One Coat Glitter in Lavender Fizz on my ring finger. Then I used Impulsive to paint on the dots and stripes on the blue nails (I alternated on my other hand, so the dots were on the thumb and so on), then I added highlights of the glitter on each nail as well, and then mattified with GOSH Matt Effect top coat!

Saturday, September 15, 2012

NOTD Sep 15/12 - vertical dots and glitter tips!

Sometimes I get a random idea for an abstract nail design that I haven't seen anywhere (to my knowledge anyways, if this design has already been done by someone, I either haven't seen it or I have but it went straight to my subconscious mind). When I do, they either turn out NOTHING like what I pictured in my head, or really cool. In this case, I think it falls into the really cool category!


The design itself is simple. Vertical dots on the nails, in alternating colours, with different sized dots and different length rows. And then glitter on the tips. I wouldn't mind trying out other colour combos, but I love how this looks the first time around!

 The blue dots are Nicole by OPI in "Baby" Blue, the pink dots are Revlon Pink Lingerie, and the silver glitter is LA Girl Glitter Addict in Explosion.

Wednesday, September 12, 2012

NOTD Sep 12/12 - peachy pink and gold glitter gradient

I just got all those glitters in from my Cherry Culture order, and it had been so long since I did one of my favourites, a glitter gradient!


First was a couple coats of LA Girl Nude Polish in Dainty, then I sponged on Sally Hansen
CSM in Gilty Pleasure
to start the gradient. I topped that with a sponging of LA Girl Rock Star in Live On Stage, and I had planned to stop there but it didn't quite look finished to me, so I added a thin coat of Milani Jewel FX in Gold over the tips and spilling down into the other part of the gradient and then it was perfect!

I've been lemming the Jewel FX for aages, so glad I finally got my hands on it!

Monday, September 10, 2012

Halloween and femininity, new at my Etsy!

I've completed two new sets for my Etsy shop that are up for sale as of today! One is based on a manicure I wore last month which I really loved. I tweaked it a little bit and I'm so happy with it, I think the gradients were a great touch!


The second set is ready just in time for Halloween!! It's pretty cute if I don't say so myself :p I love the little candy corns on the pinky, and I'm really happy how the jack o' lanterns turned out too!


Saturday, September 08, 2012

NOTD Sep 8/12 - pastel yellow and vines

This is a girly and pretty design that I saw on a nail wheel done by Look At Her Nails! and just loved! Mine isn't quite so delicate as hers but I still like how it turned out very much!


I started with a couple coats of NYX Salon Polish in Pastel Yellow, which you may have noticed in my haul post yesterday! Then I used a medium striper brush to paint on the little vines, dots and leaves and such in Sally Hansen Xtreme Wear's White On.